
Categories: Tutorials and Crafts
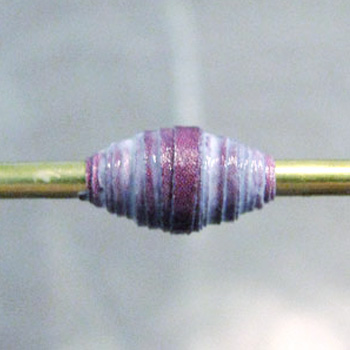
Paper beads are fun and fast to make!
Paper beads are a fantastic and eco-friendly way to create unique jewelry or decorations. Whether you’re using recycled newspapers, old magazines, or colorful scrapbooking paper, the possibilities are endless.
In this tutorial, I’ll guide you through the steps of making two classic rolled bead shapes: oval and cone. Let’s get started on this fun and easy crafting project!
Items needed for making Paper Beads:
- Bead Template: Download and print the Bead Template.
- Paper: Newspaper, scrapbook paper, recycled paper, etc. The shape and thickness of the cut paper will determine the final shape of the bead. Thicker paper makes thicker, rounder beads
- Glue: Mod Podge works well and will also seal the bead. (See Mod Podge on Amazon.)
- Wax Paper or Silicon Mat: Use a nonstick surface to dry the beads on.
- Scissors
- Bead Roller: I’ve used narrow metal dowels that I found at a craft store. You can also use a plastic straw or a toothpick.
This is a free printable pdf that fits on a 8.5 x 11 inch (letter size) sheet of paper.


How to Make an Oval Paper Bead
1. Download and print the Bead Template
2. Print out template and place the paper with the wrong side up in the center of the template.
3. Starting at #1, use a ruler to draw straight lines from where the edge of the paper and template lines intersect to the next number. Go in numerical order. This will make long triangles.


4. Using the the lines that you just drew, cut out the paper triangles.


5. Starting 2 inches from the wider end (where the pencil is in the photo below), apply glue all the way to the pointed end of the triangle. Put glue on the side of the paper that you don’t want to see. (The “wrong” side.)

6. Lay your roller over your paper 1 inch from the wider end. Fold the end of the paper over the roller and apply a drop of glue on the edge of the paper.

7. Pick up the paper and the roller – slide the wider edge of the paper to line up approximately with the roller.
8. Start rolling your paper, making sure the wide end is tucked in under the paper.

9. Roll your paper all the way to the end of the triangle making sure the paper stays centered on the bead that you are forming.

10. Smooth on a very small dab of Mod Podge to seal the outside and then gently slide it off of the dowel. Place the bead gently onto wax paper to dry.

11. Now it’s time to go back to step 5 and make your next bead!
IMPORTANT: Before making the next bead, make sure you wipe all traces of glue off the roller or else your bead will stick to it.
Let all your new beautiful beads dry for at least an hour before handling. When you are done, you can use them to make bracelets, necklaces, earrings and more!
Paper Bead Variation: How to Make a Cone Shaped Paper Bead
Do steps 1-7 from above. (Use the same template as you used for the oval beads.)
To make a cone shaped bead , roll the paper so that one side stays in line with the edge of the bead.
Seal it with a small dab of Mod Podge and slide your finished bead off your roller.


